Italiano
Ogni giorno offriamo programmi GRATUITI che altrimenti dovresti comprare!
HDR projects 4 Pro (Win&Mac) era disponibile come app gratuita il 25 novembre 2019!
Oggi Giveaway of the Day
Control remote desktop or laptop from any device and anywhere!
HDR progetti 4 consente di generare molto precisi, e scene di luce che non sono possibili con un “normale” la fotografia o la modifica di foto. Il nuovo processo super-realistica immagini con imbattibile, il contrasto e il dettaglio che non avete mai visto prima!
The current text is the result of machine translation. You can help us improve it.
Requisiti di Sistema:
Minimum: Windows 7/ 8/ 10, Prozessor Core Duo, 2 GB HDD, 1.280 x 1024 Pixels Screen Resolution, Graphic: DirectX-8-compatible, 128 MB, 32 bit colour depth; Mac OS X ab 10.7, 64 Bit, Prozessor Intel/G5, 2 GB HDD, 1.280 x 1024 Pixels Screen Resolution
Produttore:
FRANZIS Verlag GmbHHomepage:
https://www.projects-software.com/hdr/hdr-projects-4Dimensione File:
210 MB
Prezzo:
$198
GIVEAWAY download basket
Design illustrations and vector graphics, edit photos.
Manage and modify multiple graphics packages.
Access Photoshop, InDesign, Illustrator, and Acrobat software.
Manage, edit, present, and share photo images.
App gratis per iPhone »
$6.99 ➞ gratis oggi
$0.99 ➞ gratis oggi
The role of BurBur is to help you better log your training and manage your training data.
$0.99 ➞ gratis oggi
$0.99 ➞ gratis oggi
$0.99 ➞ gratis oggi
App gratis per Android »
"The Rich king" allows you to experience wealth like you've never dreamed possible!
$0.99 ➞ gratis oggi
$2.49 ➞ gratis oggi
$1.49 ➞ gratis oggi
An immersive and visually stunning experience that transforms your device into a canvas of mesmerizing fluid simulations.
$1.49 ➞ gratis oggi
$1.99 ➞ gratis oggi


Commenti su HDR projects 4 Pro (Win&Mac)
Please add a comment explaining the reason behind your vote.
I wrote this for a previous HDR Projects 4 Giveaway and then edited it for a following one, so I'll just copy it here with a few updates in case it is of use to anyone. Note this is the Pro version and they gave the standard one away before. Comparison:
https://www.projects-software.com/compare/1/3,2/hdr-projects-4-vs-hdr-projects-4-professional
I really like the Franzis Projects tools and some are quite excellent (their B+W converter is the best I know and Sharpen Projects is again excellent once you get away from its default attempt), so I always try to see if I can help people get over the initial learning curve. (Registering if you haven't done it for a Franzis tool before is also an adventure, but the tools are good IMHO.) I like their HDR tool (which you can easily use by taking three bracketed exposures, the correct one and typically ones at plus and minus two stops, allowing you to overcome the limited range of brightnesses cameras support in a single image) and think it is well worth installing. Another free option used to be HDR Efex 2 which is part of the Nik Tools which were Google and are now DXO, and were available as a free download when they were Google, so might still be around. Note the Nik tool is a Plugins but you can just (on Windows) drag a link to the HDR Efex 2 .exe to the desktop and go from there (although IIRC it just saves the result in a "standard" location rather than offering a choice). If you have Lightroom that also has built-in HDR support.
Note that HDR Projects 4 Pro has a lot of options and you may need to play around a bit to get a natural looking HDR, unless you fancy doing something with a more unnatural look (although some people are not fans of highly processed HDRs others like the effect).
Oh and while I am doing a bit of a quick start guide don't forget to check out the manual, especially the stuff on Ghosting removal starting on page 64: https://transfer.franzis.de/support/70513-HDRprojects4professional_manual.pdf .
Oh and it's a bit of a pain to register (unless you've done one of their tools before) but persevere and you'll get there.
Plus if anyone reading this doesn't know what HDR is, it stands for "High Dynamic Range" and is usually used to combine differently exposed photographs of a scene to end up with an image capturing a greater range of brightness than the camera can. The classic example is being in a dark room looking out on a brightly lit scene. The camera can show the detail in the room, with the Window solid white, or the detail outside the window but everything in the room is black. But taking a set of (typically three) exposure-bracketed (standard, brighter, darker) images of the scene you can then combine them in some HDR software and have room and outside both visible in the picture.
You can either combine multiple images into an HDR or just select a Raw file (if you have one) and work from that (it won't be as good, but a fair bit better than the JPEG).
IIRC Projects 4 Pro has a couple of advantages from 3, namely you get a Photoshop plugin as a Filter, not an Export Filter and you get support for high-resolution displays (4k. etc). For advantages over the non-Pro version see the comparison at the top of this post.
With the HDR software in today's give-away you have an additional step beyond just opening a photograph, you have to select the images to combine and choose some options. I was very pleased to see it has support for Raw file import, although as an older version I don't know how it will do with the very latest cameras (but see at the bottom for a partial solution to this).
Once you’ve imported the images it works in basically the same way as the other Franzis Projects software.
The thing to get your brain around with the Projects software is they are a huge pile of image processing tools, which are gathered together into presets in the left pane. All those options do is select a bunch of processing tools and choose options for them, so they are infinitely tweakable. HDR Projects adds a multiple image merging option on top.
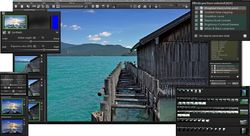
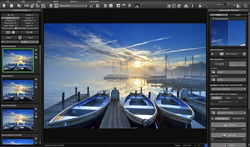
After you've loaded the image(s) you want to work with you can then play with the canned effects on the left side, play with assorted things on the right side panel (which should start on the “Finalise” tab). I'd go with the defaults in the "HDR Preparation" dialogue initially. Note the "do it" option in the bottom right.
Once you are happy with that changing to "Expert" in the right panel (entirely optional and can be ignored) means you can add filters from the list at the top, select them in the middle of the panel and tweak their effects at the bottom (may need scrolling down). (The options on the left are just choosing and configuring a bunch of these options for you.)
The boxes at the top of the left panel filter the effects that are listed in the panel, so ignore them initially. On a faster computer you can use the Eye icon on the toolbar to disable the preview mode and show the final image in the main window, which IMHO is worth trying.
When saving the final image note that the first dialog, where it asks for the title, is going to write that over the image, it isn't the file name. The main disadvantage is the lack of Undo operations, although you can save Restore points.
I literally spent 90 seconds working on an image and was really quite pleased with the result. If you don't mind the learning curve and fancy playing with HDR I'd recommend it.
Oh, and to add raw support for more recent (although not very recent) cameras download this (if you're running 64-bit Windows):
http://transfer.franzis.de/projects/RawImageDllprojects_Win64.zip
and replace C:\Program Files\Franzis\HDR projects 4 professional\FreeImage.dll (note I guessed the path as I have v5) with the dll file it contains.
If you're not running the 64-bit version of Windows, i.e. your computer doesn't have a directory "C:\Program Files (x86)" then the file you want for upgraded raw support in 32-bit Windows is: http://transfer.franzis.de/projects/RawImageDll_projects_Win32.zip
If you have a Mac you'll need to get the OSX version of FreeImage from SourceForge and replace the existing one, wherever it might be.
Good luck and enjoy!
P.S. if you want to compare their different versions look here:
https://www.projects-software.com/hdr/comparison
(Click on items to select then "Show results".)
P.P.S. one other thing, sometimes they screw up and send English users an e-mail in German rather than English, just be laid back about it... it's part of their charm (err...)
P.P.P.S. I should also say never pay full price for their software but if you want something subscribe to their newsletter and wait for the (usually) inevitable deal.
Save | Cancel
HDR projects 4 Pro has been given away before, and it's not bad, although it's much more tailored to special FX than HDR. Photoshop & Lightroom do HDR itself better, as you'd expect, and make a sort of specialty of HDR panoramas, but you also might look for Aurora, which has seen older versions given away.
Your eyes work better than any camera -- you can see in a room that has lots of light streaming through a window, and still see through the window. A camera cannot -- it can only capture a limited amount of dynamic range, light to dark, white to black. HDR is simply taking one photo at an exposure setting appropriate for the window, and a 2nd with the exposure tailored for the room, and then combining the two. Photoshop/Lightroom let you save the combined photos as a [Very large] .dng file, an Adobe RAW format, which is a bit unique among HDR capable software.
That said, higher end phone cameras are as much, if not more about the software than the optics & sensor, and some can do arguably nice HDR without the hassle of taking 2 or more shots. Better standalone cameras let you bracket shots -- automatically take more than one photo, e.g. one lighter, one darker, and one in the middle -- while cheaper cameras may let you set & lock the exposure with the camera pointed at one place, letting you then point the camera somewhere else for the shot. You could lock the exposure for the more dimly lit room for example, then take the picture pointing the camera at the window, and then a 2nd normal shot, still pointing at the window. Or if you don't want to bother with all the HDR fuss, just take 2 [or more] photos and copy/paste parts of one into the other as needed.
Save | Cancel
This one is not one but two major versions old ? :/
Save | Cancel
Grisemine, take it your horse has all it's own teeth :) donating companies do tend to give the latest non comercially available version in here. There's not much point in giving away the ones you are currently selling, if folk like it then they may buy a more up to date version, if not you've not shelled out for something you don't like.
Save | Cancel
I bought this version a few years ago, and have been pleased with its work on my bracketed landscapes. Even for scenes in the Southwest, like Bryce Canyon and the Grand Canyon, it works with the colors in the image, rather than trying to change them in the merging process. The pro version does have more features and options than the standard version.
Save | Cancel
Does anyone know how to fix the UI so it's not so tiny on my 4K monitor = 4K TV on Windows 10? Can barely see the toolbar across the top. Sometimes I get this with other software too. Don't want to just change the display settings in Personalize from the desktop as this will affect everything else too and make those program UI's too large. Thanks.
Save | Cancel
BCE, Just found the solution to this in a YouTube video named "How to Fix Program Scaling on 4K Monitors - Tutorial - Windows 10 and High Resolution Displays". https://www.youtube.com/watch?v=0txqaGV8Hi4 It worked great and enlarged the UI so it's perfect.
Save | Cancel